All posts by Leah2017

Purple Smokey Eye – With Video

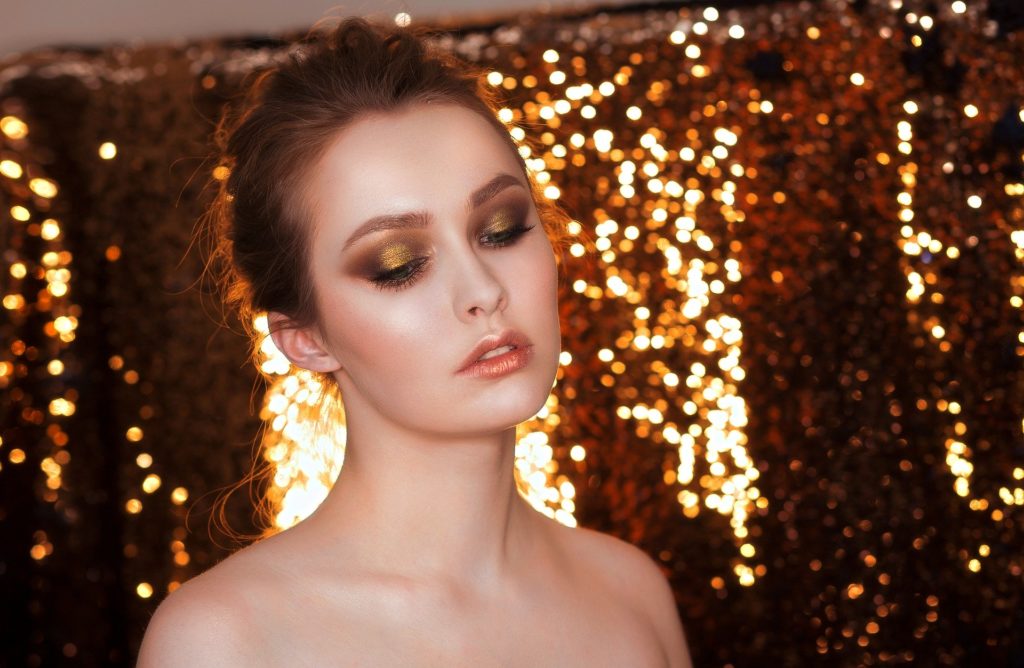
Hey everyone, needed a little purple in my life. Below are the step by step instructions for how I achieved this colorful smokey eye. Follow this Link for the Video tutorial: HERE

Products used:

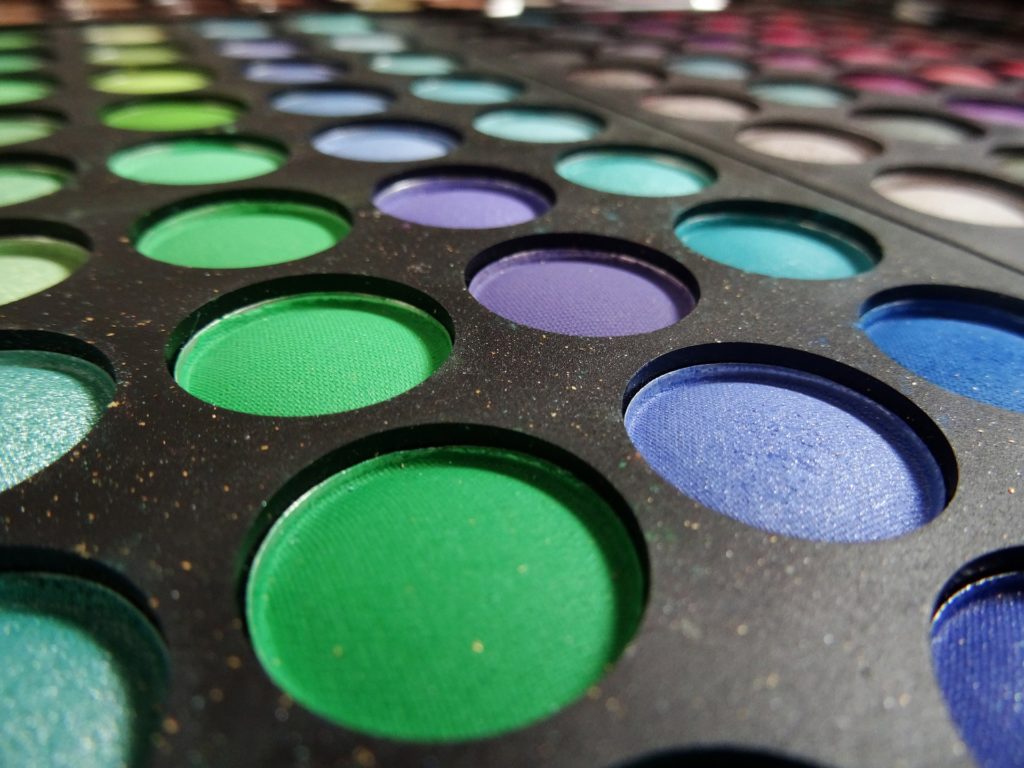
Coastal Scents 88 Color Eye Shadow Palette

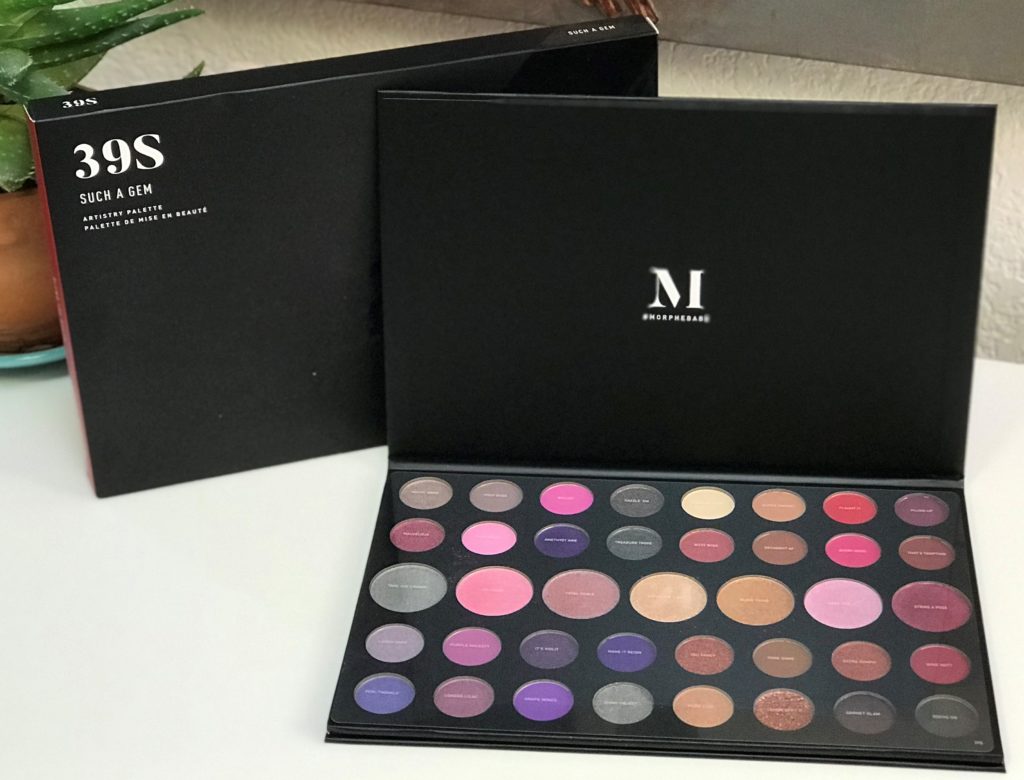
Morphe Shadow Palettes (350M, Such a Gem & Boss Mood)

RCMA Concealor/Foundation

NYX Color Correctors

Ben Nye Loose Powder

Graftobian Setting Powder

Tarte Mascara Big Ego

Brushes Used:

Color Corrector/Concealor/Pressed Powder Application:

ELF Foundation Blurring Brush

Ben Nye DB-12 Concealor brush

Setting Powder:

Ben Nye Neutral Set Loose Powder

Eyebrows:

Morphe M165

Eyeshadow:

Kryolan Art. 3714

Morphe R39

Crown SS011

Crown 237 mini smudger

Kryolan Art. 3806

I chose purples of various levels of color but kept them all cool toned. Mixing undertones can cause your shadow to look chaotic instead of blended and flowing. Using contrasting (i.e. complimentary) colors that have different undertones is different than using the same color scheme and clashing your undertones.

  1. Brow bone pale purple from the Coastal Scents 88 Color Palette. – Kryolan Art. 3714 brush (A pale purple shadow)
  2. Using a flat shadow brush apply Laven-Dare from the Such a Gem Morphe Shadow Palette to inner half of lid. – Kryolan Art. 3714 brush (A light purple shimmer)
  3. Using a flat shadow brush apply It’s Violit from the Such a Gem Morphe Shadow Palette onto outer half of the lid. – Kryolan Art. 3714 brush (a medium dark shimmer purple)
  4. Using a round blending brush apply Grape Minds from Such a Gem Morphe Shadow Palette into the crease and softly up onto brow bone. – Morphe R39 brush (matte medium purple)
  5. Place a darker color into crease, Make it Reign from the Such a Gem Morphe Shadow Palette and blend softly up into the medium color keeping most of it into the deepest part of the crease. – Morphe R39 brush (dark matte purple)
  6. For added dimension and depth I used the Morphe Boss Mood Palette color Transformer. Using the Crown SS011 brush I blended it into the deepest part of the crease to contour my eye. – Crown SS011 brush (very dark purple)
  7. To thicken my lash line I used Transformer (very dark purple) along the lash line and then my lower waterline in the outer half. – Kryolan Art. 3806 brush
  8. Using an angle liner brush applied Laven-Dare to inner waterline, then a touch of it under the brow bone and to the inner tear duct using the Crown 237 mini smudger
  9. For additional smoking out beneath the eye I smudged out Grape Minds beneath the lower waterline outer half of my eye. – Crown 237 mini smudger

And there you have it!

Method Makeup Academy, Sacramento’s Makeup School

Glow Ahead Illuminating Face Oil Review

Ok, so here’s the skinny on this. It’s a SHORT review because I couldn’t wear it. For one it has rose oil in it which immediately broke me out. But aside from the breakout what really had me shying away from this product was the shimmer in it. Some people are REALLY into the glowy look and don’t mind being blingy, but as a forty year old woman glitter on my face is NOT an appealing option. Glitter and shimmer and too much GLOW makes all those fine lines and cough, cough, wrinkles that start appearing after a certain age. So this is not the face oil for me.

Now, to be honest and fair, the fragrance is beautiful, the oil applies light and even and doesn’t leave you greasy or sticky. It’s a very nice product and for those of you who like the shimmer it would be a lovely addition to your skin prep routine. Though it is on the pricy side clocking in at $42 for only 0.84oz.

Wander Beauty Glow Ahead Illuminating Face Oil can be found at Sephora or through their website at: Wander Beauty.

So, there you have it!

Method Makeup Academy, Sacramento’s Makeup School

Saturday Skin Waterfall Glacier Water Cream Review

So, I’ve been using Saturday Skin Waterfall Glacier Water Cream for the past two months to keep my skin hydrated. All in all it’s not a bad product. But I’m not wowed by it. On the plus side it is very gentle for those of you like me with hyper-sensitive skin.

Active ingredients listed on its website are pretty friendly to the sensitive skin crowd:

Key Ingredients: 

-Alaska Glacier Water: Mineral-rich water protects skin from free radicals while promoting optimal absorption of moisture.
-Xpertmoist: A fusion of ferment extract and amino acids that shields skin from dehydration while improving skin vitality.
-Iceland Moss: Calms and reduces redness while promoting hydration.
-Cha-7 es Complex™: An exclusive peptide formula that promotes skin’s natural regeneration process.

DERMATOLOGIST TESTED. NO PARABENS, SULFATES, SYNTHETIC FRAGRANCE OR SYNTHETIC COLOR.

It does nicely hydrate even my dry skin and a little bit goes a long way, so the $39 price tag won’t make you cringe because you’ll only need a tiny dab in the morning and another tiny dab each night. I’ve been using it religiously and have barely made a dent. All in all it’s a good product, but there are two things about it that I personally just don’t like.

  1. It smells a little odd to meet, not bad, just more medicinal. It IS a pretty mild smell, so it shouldn’t bother most people and after a few days I did get used to the smell.
  2. It feels cold and slimy. It’s a gel so for those of you who like a more creamy, lotion-y product that might be a turn off. I wasn’t a huge fan of the slimy and I’m still not a fan, but it’s not enough of an issue to keep me from recommending this product.
  3. And this is the one that really keeps me from giving this moisturizer a full 5 Starts: It leaves a residue on your skin that gums off throughout the day. I really, REALLY don’t like that. I like moisturizers that absorb and leave the skin clean feeling. Saturday Skin Waterfall Glacier Water Cream leaves a gummy film over your skin. To meet that’s annoying and it affects my makeup a little bit.

So, my overall rating? 4 Stars. Which ain’t too shabby! It is super gentle on your skin, very hydrating and a little bit goes a long way. If you don’t mind a gel style moisturizer and don’t think residue left on your skin is that big of a deal this moisturizer might just be your perfect skin care match.

Until next time….

Method Makeup Academy, Sacramento’s Makeup School

February Recap

Hey everyone, just a quick update and check in.

So far February has been a busy month for both Personify Bridal and Method Makeup Academy. You’d think this early in the year not much would be happening, but you’d be wrong. While still too early to be in full swing, bridal season has begun. We are currently heavy into engagement season, which means BRIDES, BRIDES, BRIDES! Last month, January, Personify Bridal booked 10 weddings for the 2020 Bridal Season. February has already seen 8 weddings booked! Very exciting! The first wedding of 2020 took place the day after Valentine’s with the beautiful Charlise. This coming Saturday we’ll be out at 2 more weddings.

Personify is looking at a big season, but that’s not all. Method Makeup Academy is very exciting to be introducing a Fashion & Editorial Boot Camp coming April 2020.

Are you guys READY for this?!?!?

A BRAND NEW class coming to our school! We are so excited. We’ve kept this hush hush for a while now while we’ve been putting it together just right for you guys and now we proudly – and excitedly – present our spring launch of the “Fashion & Editorial Bootcamp”. This class is an intensive 2 Day experience for any artist. (It is preferred you have taken our Pro Makeup Class, are licensed Cosmo or Esti, or have basic makeup experience. Not recommended for beginners). Not sure where you fall? Just reach out!

This advanced class will be taking you through:

-skin prep to create flawless and clean magazine skin

-face charting for success -creating a mood with color and mixed media

-tapping into your inner artist (looks will be creative)

-portfolio builder with in house photo shoot at the end of class of your finished work to submit and keep for your book.

We are SO EXCITED to bring this to you there is no other class like it in Nor Cal and we took the time and steps to make it unique for you that being said we are only taking a group of 5 at a time for this workshop. And as a launch special we are offering our first group special pricing of $400 (regular price $575)

Contact us at (916) 899-7047 OR dm us to reserve your spot!!

Method Makeup Academy, Sacramento’s Makeup School

Product Review: Dr. Brandt’s 24/7 Retinol Eye Cream

Hi Everyone,

For the last month I’ve been using Dr. Brandt’s 24/7 Retinol Eye Cream morning and night. Now, to start I will admit my eyes aren’t in desperate need of an eye cream, however, as I am now in my 4th decade there are some fine lines developing. While I’m embracing my aging it doesn’t mean I want to neglect my skin and speed up the process. So I was really happy to try out this eye cream. Made with Retinol and their Ruby Crystal Complex (Whatever that is supposed to mean….I mean really, crushed rubies? How are rubies supposed to make my eyes look younger???) This is a lightweight eye cream that is to be applies along your eye socket each night. I’ve been doing it morning and night because, why not? A small amount is all you need, patted in gently with the pad of your finger so you don’t bruise or stretch the skin.  It feels nice, is very gentle for those with sensitive skin like myself, however I haven’t noticed any change to my eyes. No plumping, no smoothing, nothing.

I was hoping I would notice something in almost 30 days of consistent use, however there has been no improvement. True it hasn’t made my skin worse, but it’s really hard for me to recommend you buy a $55 product when there’s nothing to show for it.

My opinion? Not worth the price tag. Yes it smells nice, yes it’s gentle, but so are many, MANY eye creams and lotions out there. Don’t waste your dimes on this one folks. Sorry Dr. Brandt, it’s time for you to try again.

Until next time,

Arrvada

Method Makeup Academy, Sacramento’s Makeup School

Step by Step Eye Shadow Look: Halo

Image by Irina Gromovataya from Pixabay

Halo Shadow

  1. Base (Lite color across entire lid & up to eyebrow) * This is Step 1 for EVERY Eyeshadow Look.
  2. Apply a Med color on inner and outer corners of the eye lid. Blend towards center of the eye leaving a space open in the center of the eye over the pupil.
  3. Blend a Med/Dark color up into crease and softly onto brow bone.
  4. Apply dark color into crease and blend up into the Med/Dark brown to soft, leaving most of the dark in the deepest part of the crease.
  5. Add a lite color or shimmer/glitter to the very center of lid and softening slightly over the inner and outer edges of the lid.
  6. Optional Step – If needed apply Highlight to inner Tear Duct and at Arch of Eyebrow.

Method Makeup Academy, Sacramento’s Makeup School

Overdrawing Lips – Extreme

EXTREME LIP ENLARGEMENT OR RECONSTRUCTION: (CAUTION: This does not look natural in person, but will be fine for stage and some photo work)

Step 1: Using a Green Color Corrector neutralize the whole lip area.

Step 2: Apply a cream based foundation with a sponge.

Step 3: Set area with a neutral setting powder.

Step 4: Use a Nude Lip Liner slightly darker than their natural skin tone and draw the new shape of the lips you desire.  Make sure everything is filled in in the middle. 

Step 5: Using a cream based highlighter or a white/cream lip pencil, highlight the new cupid’s bow.

Step 6: Using a cream based contour or a neutral brown eyebrow pencil contour the underside of your new lower lip to create a little bit of a ‘ledge’.

Step 7: At this point you can set it with a neutral or colorless powder to matte it out because you are trying to recreate the appearance of a real lip and not a false lip.  NOTE: Real lips have ridges so you are trying to create that illusion with the nude lip liner. 

Step 8: Take a lip liner that matches the lip stick that you are wanting to use but it one shade darker. You are going to line the along the edge of the nude fake lip has been made, you are going to treat that as the outside of your lip

Step 9: Using a lip liner the exact color of your lipstick that you want to be use it to liner the entire lip again and fill in the center completely with the lip liner so you have created a false labial roll with the nude and a false vermilion with the nude lip liner.

Step 10: After you have filled in the false lip with the lip liner completely you are going to take a matte lipstick, no shimmer, no shine,(Because light will attach to it and make it obvious that it is a false lip.  The light will show where the natural ridges and curves to our lip are and draw attention away from the false lip that you have created.) one shade DARKER than the ideal lip color that you want.  Apply to the outer edges of your lip.

Step 11: Then using a lipstick that is the perfect shade you will apply the lipstick over the entire lip area as though the whole are is the real lip.  (Again this must be a MATTE lipstick.  If you do not have a matte lipstick, but you have a color you really want to use that has a gloss or a shimmer to it, you can go over it with a matte eye shadow, or blush of the same color to set it and matte it out.)

Step 12: Using a final lipstick one shade lighter than the ideal lip color, apply it to the very center of the lips and blending.

Step 13: Set with a neutral set powder.

And that is how you over draw your lips.

Method Makeup Academy, Sacramento’s Makeup School

Step by Step Eye Shadow Look: Half Cut Crease

Image by SaadiaAMYii from Pixabay

Not all eyes can pull off a Full Cut Crease, so here is a good option for those with a smaller eye or a drooped crease like me. Enjoy trying this look out.

  1. Base (Lite color across entire lid & up to eyebrow) * This is Step 1 for EVERY Eyeshadow Look.
  2. Blend a Med/Dark color up into crease and softly onto brow bone.
  3. Apply dark color into crease and blend up into the Med/Dark brown to soft, leaving most of the dark in the deepest part of the crease.
  4. Cut your crease on inner lid only with concealer or eye primer
  5. Pack lite color (or shimmer or glitter) onto the inner half of the eye lid.
  6. Optional Step – If needed apply Highlight to inner Tear Duct and at Arch of Eyebrow.

Method Makeup Academy, Sacramento’s Makeup School

How to do Classic Pin-Up Makeup

Image by Alexandr Ivanov from Pixabay
  1. Apply your foundation and powder as usual.  Makeup sure you have a flawless, finish.
  2. Apply a Matte white shadow on lid and brow bone
  3. Apply Light brown in crease
  4. Apply liquid black liner to upper lid, winging slightly out and at an upward angle.
  5. Apply White liner on lower water line
  6. Apply a heavy coat of mascara or apply false lashes
  7. Draw on or fill in your brows to define them.  Use a ½ shade darker then you normally would for an added touch.
  8. Apply your Blush:  Use a light peachy pink blush if you are doing red lips.  Use a pinky blush if you are doing hot pink lips.
  9. Avoid highlighting or contouring unless needed for balancing features
  10. Avoid shimmers in shadows, try to use all matte
  11. Apply your lips, using either bold red or hot pink for a more modern flare to your pinup look.
  12. Use black liquid liner to create a Beauty Mark on side where hair your hair is parted from

Method Makeup Academy, Sacramento’s Makeup School

Step by Step Eye Shadow Look: Smokey Eye

Hello everyone, for those of you who love a sultry look, here’s a detailed step by step.

  1. Base (Lite color across entire lid & up to eyebrow) * This is Step 1 for EVERY Eye shadow Look.
  2. Apply dark color to full lid.
  3. Blend a Med/Dark color up into crease and softly onto brow bone.
  4. Apply dark color into crease and blend up into the Med/Dark brown to soft, leaving most of the dark in the deepest part of the crease.
  5. Optional Step – If needed apply Highlight to inner Tear Duct and at Arch of Eyebrow.
  6. Optional Step – Apply Highlight to the center of the eyelid right over the pupil to create a Halo Effect.

Good luck and have fun trying out this look!

Method Makeup Academy, Sacramento’s Makeup School